Please Note: This page applies to EasySSO versions from 2.5.x and earlier
If you are using version 2.6.0 - 3.4.x – please read instructions on EasySSO Get Started - for 2.6.x - 3.4.x page instead.
If you are using later versions – please read instructions on the Getting Started with EasySSO all-in-one home page.
If you have any questions please reach out to our support via our ServiceDesk
Follow these step by step instructions to configure EasySSO
Step-by-step guide
| Step | Action | Screenshot | Notes |
|---|---|---|---|
| 0 | Before you begin - The most important part of the configuration is the domain name and computer account. Please read IOPLEX Jespa Operators Manual about these (page 8). You will need a computer account with a password. Since creating one requires you to be logged on as AD Admin - we cannot automate this task, please work with your Active Directory administrators on this. IOPLEX Jespa package contains two .vbs scripts that one can run from commandline to assist with this task. One is a full wizard that will create the computer account - you will need to be a domain administrator to be able to do this. The other one can be used by your domain administrators to set a password on computer account if they create it manually. | ||
| 1 | Obtain EasySSO from Atlassian Marketplace | ||
| 2 | Obtain license from Atlassian Marketplace | ||
| 3 | Once installed click Configure in UPM to proceed to the configuration wizard | ||
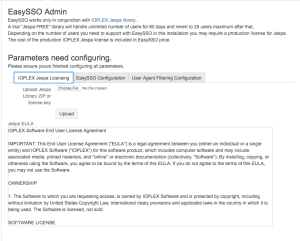
| 4 | Obtain and install IOPLEX Jespa library | ||
| 5 | Read IOPLEX EULA. Continuing past this point signifies your acceptance of the terms of EULA. | ||
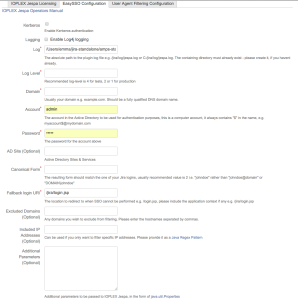
| 6 | Switch to "EasySSO Configuration" tab and configure parameters required for EasySSO to work. Please note these parameters are passed to Jespa and as such are described in detail in IOPLEXJespaOperators Manual - PDF is included in the zip and a link to this PDF will appear above configuration parameters form once you upload the Jespa distribution zip - in case you need to study it in more detail. | ||
| 7 | For the start – leave Kerberos authentication unchecked | ||
| 8 | For the start – leave Log4J logging option unchecked. | ||
| 9 | Set log file location. | EasySSO will suggest jespa.log file in the logs directory of the application home by default. If not sure – leave as is. | |
| 10 | Set logging detail level. | ||
| 11 | Specify DNS name of your domain e.g. mydomain.org | ||
| 12 | Obtain a computer Active Directory account with a password in your Domain from your Active Directory Administrator. If this takes more time than expected, you can save the parameters already entered on this screen and return to this screen later. | Why do I need a new computer account? Can I use the account of the same server/vm/box that JIRA is installed on? | |
| 13 | Consult with your Domain Administrator if use of "AD Site" is necessary | ||
| 14 | Canonical user account form depends on the format of usernames used in JIRA. Please read IOPLEX Jespa Operators Manual about this. Most installations will use canonical form=2 eg for usernames like "johndoe". | ||
| 15 | Please specify your login location for fallback when authentication cannot be completed successfully eg /jira/login.jsp | ||
| 16 | If you are running behind Apache or IIS - please review page 3-4 of IOPLEX Jespa Operators Manual for additional config that needs to be done to these front-facing web servers. If you are using NGINX - see our FAQ entry on that. | ||
| 17 | If you are installing EasySSO into multiple Atlassian applications, that are integrated via Application Links you will need to configure mutual filtering between applications as NTLM/Kerberos is not supported when building or verifying the application link. This can be done either using IP Filtering or User-Agent filtering to disable NLTM/Kerberos when for example JIRA contacts Confluence and vice versa. User-Agent filtering seems to be preferred by most customers. In our FAQ we specifically answer the question "My Application Links don't work after installing EasySSO?" with instructions on how to configure User-Agent filtering. |
Community/Non-profit license holders - please note that IOPLEX Jespa license is usually not free for community organizations, and you will need to contact sales at ioplex.com to negotiate a discount code. We will appreciate if the order is placed via us - but it's not required. EasySSO will not work with a trial IOPLEX Jespa license after Jespa trial has expired with more than 25 users.
Additional browser configuration that may be required while you test:
- Internet Explorer - it will only do SSO to the sites it recognizes as intranet. This is usually done via group policy. If you get a windows domain popup trying to access JIRA - click Esc (it should revert to login page) and verify that the site is recognized as Intranet site, if not - add it manually. Close all IE windows, reopen, try again. If it still give you the popup - review Jespa logs (at the location you've specified in the config) there is probably some error message there - feel free to send this to our support email (at the top of this website), we are here to help!
- Google Chrome - once IE is working, Google Chrome should work too, since it takes it's settings from IE.
- Firefox - requires manual configuration. Type "about:config" (without quotes) in address bar, confirm that you are aware of the risks of changing browser configuration, then type "ntlm" (without quotes) in the search bar - several parameters will be displayed. Add your host to the list of network.automatic-ntlm-auth.trusted-uris, use comma to separate hosts if required. For Kerberos - search for "negotiate" (without quotes) and add your host to the list of network.negotiate-auth.trusted-uris, use comma to separate hosts if required.
Pair EasySSO with User Management for Jira and Confluence. Visit the Atlassian Marketplace for more information.


