Please Note: This page applies to EasySSO versions from 2.6.0 to 3.4.2.
If you are using earlier versions – please read instructions on How to install EasySSO for 2.5.x and earlier page instead.
If you are using later versions – please read instructions on the Getting Started with EasySSO all-in-one home page.
If you have any questions please reach out to our support via our ServiceDesk
Step-by-step guide
Obtain EasySSO from the Atlassian Marketplace.
If you have no Internet connectivity: Obtain an EasySSO license from the Atlassian Marketplace and install the license via the Universal Plugin Manager (UPM).
If you have Internet connectivity: In the UPM you will be asked for your email and password to the Atlassian Marketplace. Enter these and the EasySSO license will be added automatically.
- Once installed click Configure in UPM to proceed to the configuration wizard. You can also arrive to this screen by clicking EasySSO link under "TechTime Add-Ons" section usually located in the left panel of the Admin screen.
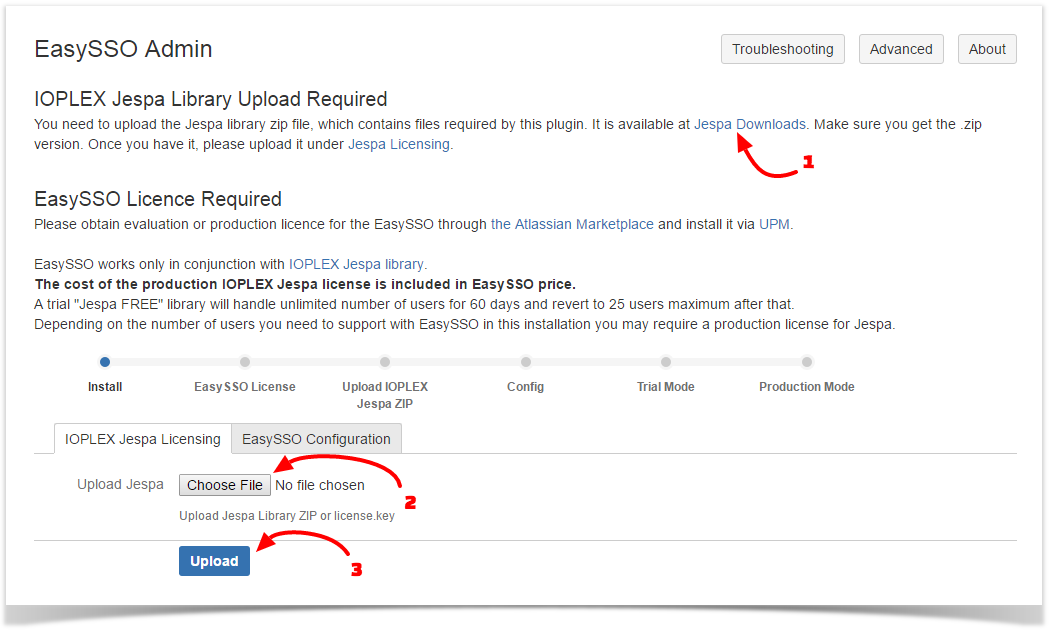
Follow the link on the screen to get the IOPLEX Jespa library and install it. See the screenshot on the right.
Read more about the role of IOPLEX Jespa license.
5. Read the IOPLEX EULA.
Continuing past this point signifies your acceptance of the terms of IOPLEX EULA.
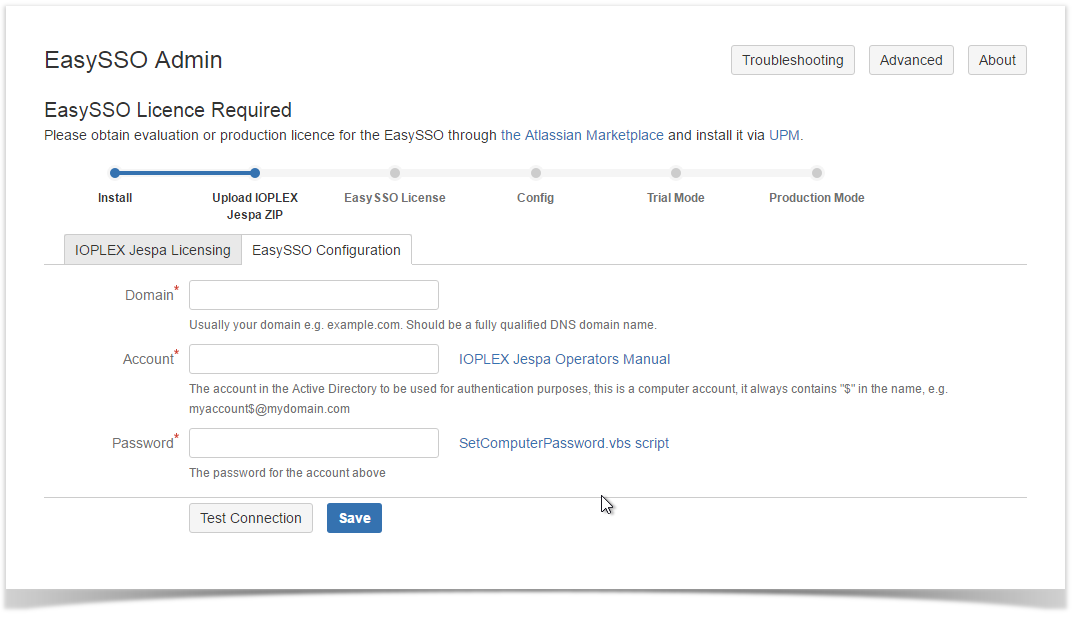
6. Go to "EasySSO Configuration" tab
7. Fill in your domain name. If you don't know what your domain is it is better to consult your Active Directory Admin or you can use the method described in our "Determining AD forest" FAQ page. One of the values returned will be the domain name ("Dom Name").
8. Obtain a computer Active Directory account with a password in your Domain from your Active Directory administrator.
The account can be created (also known as "pre-staged") using standard Microsoft tools as described in this Technet article.
Password can be set from the command line using "net user <username$> <password> /domain" command described in this Technet article.
This is the most important part of the configuration. If this takes more time than expected, you can save the values already entered on this screen (if any) and return to this screen later.
Please read IOPLEX Jespa Operators Manual about these (page 8). The manual is available for download from the link from within EasySSO configuration screen and About screen once you've uploaded IOPLEX Jespa .zip package.
You will need a computer account with a password.
Since creating this requires one to be logged in as an Active Directory administrator - we cannot automate this task, please work with your Active Directory administrators on this.
Please pass IOPLEX Jespa .zip package to them – it contains the Operators Manual and the necessary command-line scripts to help them accomplish this task.
IOPLEX Jespa package contains two .vbs scripts – one script is a full wizard that will create the computer account and set the password - you will need to be an Active Directory administrator to be able to run these scripts. The other one can be used by your domain administrators to set a password on computer account if they create it manually using default tools from Microsoft.
If you are an Active Directory administrator yourself – we have created a link for you called 'SetComputerPassword.vbs script' on the EasySSO Configuration tab (next to the password field)
9. Proxies: If you are running behind a reverse proxy e.g Apache - see Configuring Apache as a reverse proxy for EasySSO in our FAQ for the additional config that needs to be done to these front-facing web servers. If you are using NGINX - see How to Configure NGINX in our FAQ. If you are using IIS - see Configuring IIS as reverse proxy in our FAQ
10. If you are installing EasySSO into multiple Atlassian applications, that are integrated via Application Links you will need to configure mutual filtering between applications as NTLM/Kerberos is not supported when building or verifying the application link.
This can be done either using IP Filtering or User-Agent filtering to disable NTLM/Kerberos when for example JIRA contacts Confluence and vice versa. User-Agent filtering seems to be preferred by most customers.
In our FAQ we specifically answer the question "My Application Links don't work after installing EasySSO?" with instructions on how to configure User-Agent filtering.
11. Browser Setting: For the duration of your testing - change the browser settings according to these instructions.
12. Take a look at our FAQs page to see if there are any scenarios that apply to you which could make your life easier.
13. If you want to configure EasySSO further please read the Advanced configuration for EasySSO instructions. Here you will find information on:
a) Specifying log levels and log file locations
b) the AD site configuration
c) setting the canonical form of your user accounts
Pair EasySSO with User Management for Jira and Confluence. Visit the Atlassian Marketplace for more information.


